
Maintenance
How-to guideLiftMaster 98022 Wall Mount Garage Door Opener Review & Guide
October 20, 2026 · Prime Garage Doors
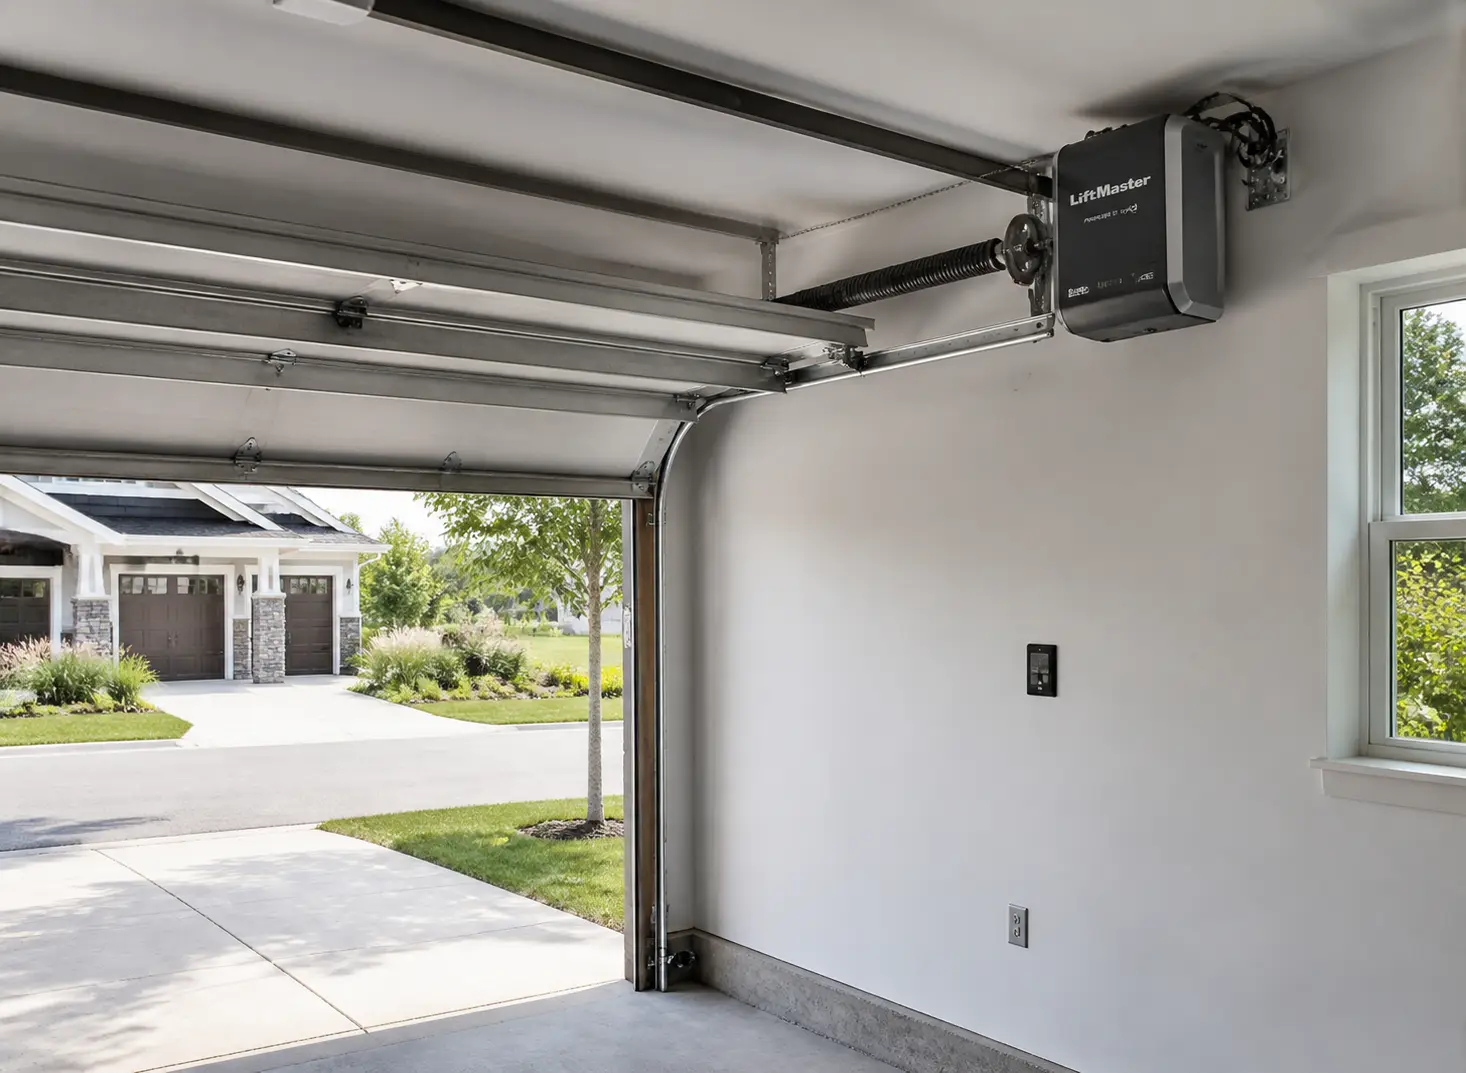
An in-depth review of the LiftMaster 98022 Elite Series wall-mount garage door opener. Explore its specs, key smart features, and installation requirements.
The LiftMaster 98022 Premium Series wall-mount garage door opener mounts directly to the wall beside your garage door, eliminating the need for a traditional ceiling-mounted central rail. Powered by a quiet DC motor with integrated smart connectivity, battery backup, and automatic deadbolt locking, it frees up overhead ceiling space for storage, lighting, or high-lift vehicles. For homeowners seeking a clean garage layout or operating doors under rooms with low vibration tolerance, the 98022 offers a specialized direct-drive alternative—provided your garage uses a compatible front-mount torsion spring system.
How the LiftMaster 98022 Works and Why Homeowners Choose It
Traditional garage door openers rely on a long central rail attached to the ceiling, housing a chain, belt, or screw drive that pulls a trolley attached to the door. In contrast, the LiftMaster 98022 is a side-mount (also known as a jackshaft) opener. It mounts directly on the left or right side of the garage door frame and clamps directly onto the front torsion shaft. When activated, the unit turns the torsion bar directly, rotating the cable drums to pull the door open or lower it smoothly.
Removing the center rail and overhead motor unit creates significant open vertical space across the ceiling. This makes side-mount openers popular for garages with high or vaulted ceilings, structural support beams, or overhead storage racks. Because the motor mounts to the wall stud rather than hanging from ceiling joists, mechanical vibration transferred into living spaces located directly above the garage is drastically reduced. This direct wall-mount design provides ultra-quiet operation, making it ideal for attached homes with bedrooms or office spaces overhead.
It is important to understand the distinction between freeing up rail space and the physical space required for the door panels themselves. While a side-mount unit eliminates the central motor hanging in the room, the door panels still travel along the garage door track system into their horizontal resting position. Eliminating the central rail does not alter the physical travel arc of the door. Furthermore, side-mount openers depend entirely on proper door weight distribution and mechanical balance. If your door binds or sticks during manual operation, you must fix garage door binding issues before installing any wall-mount motor.
Compatibility Requirements and Visual Inspection Checklist
Before selecting the LiftMaster 98022, verifying mechanical and structural compatibility is essential. Side-mount openers operate under specific hardware conditions:
- Front-Mount Torsion Springs: The LiftMaster 98022 drives the door by rotating the torsion shaft directly. The door must use a standard front-mounted torsion spring system. Doors equipped with extension springs that stretch along the upper horizontal tracks are not compatible unless fully converted to torsion springs by an experienced technician.
- Solid Torsion Shaft Extension: The solid metal torsion bar extending from the spring assembly must project far enough beyond the bearing plate on the mounting side to allow the opener's drive collar to clamp securely.
- Side Wall Clearance: Adequate clear wall space is required directly beside the garage door track system. The mounting area must be free of exposed plumbing pipes, electrical conduit, structural timber posts, or gas lines.
- Nearby Power Outlet: Unlike ceiling-hung openers that plug into overhead receptacles, the LiftMaster 98022 requires an electrical outlet located on the side wall near the opener mounting height.
- Track System Profile: The 98022 functions smoothly with standard lift, high-lift, and full vertical lift designs. However, low-headroom setups using double horizontal tracks often require specialized adapter kits or may be unsuitable for side-mount operation.
According to high-tension hardware safety notices provided by the U.S. Consumer Product Safety Commission (CPSC), garage door springs, cables, and bottom brackets remain under severe mechanical tension capable of causing serious injury. Homeowners must restrict preliminary checks to visual observation from the ground and avoid attempting to adjust springs, tension cables, or mounting plates independently.
Step-by-Step Guide to Evaluating and Preparing for a LiftMaster 98022 Installation
Preparing your garage for a side-mount opener involves verifying physical clearances, electrical provisions, and mechanical balance. Follow these sequential visual evaluation steps before scheduling professional installation.
Step 1: Verify Front-Mount Torsion Spring Hardware
Stand inside the garage with the door fully closed and inspect the spring assembly located directly above the top of the door frame. Confirm that your system utilizes a horizontal metal shaft running parallel to the door header with coiled torsion springs wound around the shaft. If your door instead uses stretchable extension springs mounted along the side tracks, a professional conversion to a torsion spring system will be required before installing the LiftMaster 98022.
Step 2: Check Side Wall and Overhead Clearances
Inspect the wall section on both the left and right sides of the garage door frame to determine which side provides the cleanest mounting location. Ensure there is adequate open flat wall space adjacent to the vertical track. Verify that no exposed water lines, heating ducts, electrical junction boxes, or shelving units obstruct the area where the motor body will sit against the wall studs.
Step 3: Assess Electrical Outlet Access Near the Mounting Side
Locate the nearest grounding electrical outlet relative to your chosen mounting side. The LiftMaster 98022 relies on a standard grounded power cord. If an outlet is not present within reach of the unit's power cable on the side wall, arrange for a qualified electrician to install a dedicated wall outlet near the top corner of the garage door frame prior to opener installation day.
Step 4: Examine the Garage Door Track System for Smooth Travel
Perform a visual inspection of the horizontal and vertical sections of the garage door track system. Look for bent track lips, rust buildup, loose mounting brackets, or missing roller caps. Because a side-mount motor applies torque directly to the shaft, any physical drag or misalignment along the track channels will trigger the opener's safety reverse mechanism or cause premature motor wear. Ensure all tracks are straight, parallel, and firmly secured to the wall framing.
Step 5: Plan Safety Sensor and Smart Lock Wiring Routes
Identify clear wiring pathways from the side wall motor location down to the bottom corners of the door opening, where photo-eye safety reversing sensors must be installed. Additionally, inspect the vertical track on the opener side to identify the mounting spot for the automated garage door lock. This powered deadbolt pin projects directly into the garage door track system whenever the door closes, physical locking the door against manual forced entry.
Step 6: Schedule Professional Mounting and Cable Tensioning
Contact an experienced garage door professional to complete the physical mounting, torsion shaft coupling, and electronic setup. Your technician will secure the drive collar over the torsion bar, mount the motor housing firmly to the wall stud, install the cable tension monitor to prevent spooling, connect the battery backup, and program all remote controls and smart myQ connectivity features.
Post-Installation Care and Maintenance Tips
Regular maintenance ensures your LiftMaster 98022 operates quietly and reliably for years while protecting your door's mechanical structure. Seasonal changes in temperature and humidity throughout New England can cause slight metal expansion or contraction, making periodic care essential.
Keep these ongoing maintenance practices in mind:
- Lubricate Moving Components Correctly: Apply a high-quality synthetic silicone or white lithium lubricant strictly to moving steel roller bearings, end bearing plates, and hinge pivot points. Never apply lubricant inside the garage door track system channels. Applying oil or grease inside the tracks collects dirt and grit, causing the rollers to slide instead of turn.
- Keep Safety Sensors Clean and Aligned: Periodically wipe the lenses of the bottom photo-eye safety sensors with a clean, dry microfiber cloth. Ensure dust, cobwebs, or debris do not obstruct the invisible light beam across the threshold.
- Inspect the Automatic Door Lock: Visually check the electronic deadbolt pin periodically to ensure it engages smoothly into the track hole when the door closes without rubbing against the metal edges.
- Test Battery Backup Functionality: Check the indicator light on the opener housing to confirm the internal battery backup is fully charged and ready to supply power during local power outages.
- Wipe Down Track Channels: Clean the interior surfaces of the vertical and horizontal tracks using a clean rag to remove accumulated dust, sap, or road debris without applying chemical solvents or grease.
Regional Considerations and When to Call a Professional
Garages in Greater Boston present unique architectural challenges, from low ceiling joists in older historic homes in Cambridge and Brookline to vaulted ceilings in modern Newton additions. Cold New England winters can freeze moisture inside unheated garages, putting added strain on opener drive mechanisms and torsion hardware.
Installing a LiftMaster 98022 requires precise physical alignment between the opener's drive shaft collar and the door's torsion bar. Attempting to install a side-mount motor on a door with mismatched spring tension, worn cables, or misaligned tracks can lead to dangerous shaft slippage or motor failure. Experienced technicians possess the specialized tools required to set proper torque levels, set electronic travel limits, and mount cable tension monitors accurately.
Whether you require regional assistance such as saratoga springs garage door repair, suburban updates like garage door repair framingham ma, or dedicated residential service through garage door repair boston, professional installers evaluate your door's structural integrity before any hardware is mounted.
Prime Garage Doors offers free estimates, 24/7 phone support at (844) 321-0914, and same-day service availability across Greater Boston. Our experienced professionals evaluate your space, verify spring balance, and ensure your new LiftMaster 98022 operates safely and efficiently.
Key Takeaways
The LiftMaster 98022 is a space-saving wall-mount opener that eliminates overhead ceiling rails, operates with minimal vibration, and provides advanced smart security features. Success depends on selecting the opener for compatible door configurations with standard front torsion springs, clear side wall space, and proper mechanical balance.
- Wall-mount openers attach directly to front torsion shafts and are incompatible with extension spring systems without professional spring conversion.
- Removing central ceiling rails frees overhead vertical space but does not alter the travel path of door panels along the garage door track system.
- Lubrication must be applied exclusively to roller bearings, hinges, and end bearings—never to the inside of the track channels.
- High-tension components like torsion springs and lifting cables must be inspected visually by homeowners and serviced exclusively by professionals.
If you are planning to upgrade your garage layout with a LiftMaster 98022 or need expert assistance evaluating your door's mechanical compatibility, Prime Garage Doors is ready to assist. Our team provides same-day service availability, 24/7 phone support, and free estimates throughout Greater Boston. Request a Free Estimate online or Call Now at (844) 321-0914 to schedule your service appointment.
Frequently asked
- Can the LiftMaster 98022 be installed on any garage door?
- The LiftMaster 98022 requires a standard front-mount torsion spring system and adequate side wall clearance. It is not compatible with extension spring systems unless the setup is converted to torsion springs by an experienced professional. Additionally, your garage door track system must be properly aligned and physically balanced prior to installation.
- What are the primary benefits of choosing a wall-mount opener like the LiftMaster 98022?
- Mounting the opener directly to the side wall frees up vertical ceiling space for overhead storage, lighting, or high-clearance vehicles. Because the unit attaches to wall studs rather than ceiling joists, it drastically reduces noise and mechanical vibration transferred into overhead living spaces. The 98022 also includes an automatic deadbolt lock, smart connectivity, and integrated battery backup.
- Can I install the LiftMaster 98022 as a DIY project?
- Professional installation is strongly recommended because side-mount openers connect directly to the door's high-tension torsion shaft. Torsion springs and cables operate under extreme tension that can cause severe injury if mismanaged. Experienced professionals ensure precise shaft coupling, proper cable tension monitor installation, and correct electronic safety limit setup.
- How should I maintain my LiftMaster 98022 and door hardware?
- Maintain quiet operation by applying synthetic lubricant strictly to moving steel roller bearings, hinges, and end bearing plates. Never apply lubricant inside the garage door track system channels, as grease attracts debris and causes rollers to slide. Routinely wipe down the safety reversing sensor lenses and ensure the automatic deadbolt pin engages smoothly into the track.
- Does the LiftMaster 98022 operate during local power outages?
- Yes, the LiftMaster 98022 features an integrated battery backup system that operates the opener when electrical power is cut off. This allows homeowners across Greater Boston to reliably enter and exit their garages during winter storms or utility outages. An indicator light on the motor housing displays the current charge status of the internal battery.